Posts filed under ‘cooking’
Monster cookie recipe
We made a monstrous batch of monster cookies the other day. As we went, I kept tweaking the cookies with each new pan. At the end, I had the absolutely perfect monster cookie recipe (in my opinion).
The majority of monster cookie recipes you find online include no flour. Which is great if you can’t do gluten – but it doesn’t make as perfect of a cookie as it could.
Ingredients:
3 eggs
1 3/4 cup brown sugar
1/2 cup white sugar
1 tsp salt
1 tsp vanilla extract
1 17 ounce jar peanut butter (I used soy butter thanks to allergies)
1 stick of butter, softened
3/4 cup M&Ms
3/4 cup chocolate chips
1/4 cup white raisins
2 tsps baking soda
3 1/2 cups quick oats
1 cup flour
2 tsps corn syrup
Mix your egg, butter and sugars together first. Then add peanut butter, vanilla, salt and baking powder. Then oats and flour. Then chocolate chips, M&Ms and raisins.
Scoop out cookies large. If your dough isn’t sticking together well (though it should with the above ingredients), add more peanut butter and/or corn syrup.
Bake at 350 degrees for 10-12 minutes. Take out before looking fully done (so it doesn’t get too dry from all of the oats). Put cookie pan in freezer to solidify the softer cookie. After 15 minutes, remove from the freezer and they will be good to serve.
Delicious!
Super easy (probably inauthentic) Korean food
To our cooking arsenal we’ve recently added a rice cooker and it’s revolutionary! Yum. I’ve heard stories from other adoptive parents that their children wouldn’t eat anything but rice once they arrived home. So we figured we’d better learn how to make good rice before Henry arrives home – something tells me our Minute Rice microwave version just wouldn’t cut it. 🙂
We made Korean sweet rice this weekend and it was divine! We served it with bulgogi wrapped in lettuce and it was so, so good. I will share with you the ‘recipe,’ although I don’t think you can even call it that. Super tasty and pretty quick to make. Although if you were serving it authentically, it would come with a multitude of side dishes. So this is the American version, and will serve about 4 people.
Ingredients:
1.5-2 pounds of sirloin steak
2/3 cup Bulgogi marinade (told you this was easy! We’re cheating on this part. Available at Asian grocery stores and maybe some hip grocery stores. If you can’t find it, the more Martha Stewart friendly version would be to make this: http://bbq.about.com/od/marinaderecipes/r/bl20209a.htm)
1/2 cup Rice wine (not rice wine vinegar, just rice wine. You could probably use Sake or a dry white wine)
3 tablespoons sugar
2-3 cups cooked Korean sweet rice (we used the rice cooker for this – just follow the directions in your rice cooker. It’s worth it to get the Korean sweet rice – much tastier than almost any other white rice I’ve had)
12-16 green leaf lettuce leaves
3-4 hours before meal time, cut your raw sirloin into narrow strips (about 1/2 an inch wide). Place in bowl. Add rice wine, sugar and 1/2 cup Bulgogi marinade, reserving the rest. Gently toss meat in mixture, ensuring all meat is properly covered, and cover bowl with plastic wrap. Refrigerate. (Could be done overnight) If you have a rice cooker with a delay timer, you could start the rice cooking to be done at the same time as the meat.
You can either grill the meat or cook it on the stove top in a bit of olive oil and some of the leftover marinade. If you grill it, brush strips with remaining marinade.
Because the strips are thin they will cook quickly. Cook until the sugar has caramelized on the outside – on the stove top, this took about 2-3 minutes per side.
Serve in a separate bowl along side rice and lettuce leaves for making your own wraps. Traditionally you would serve this with a Korean red chili paste mixture, but we forgot it at the Asian market so we served it with dabs of Sriracha and a drizzle of the Bulgogi marinade. Yum!
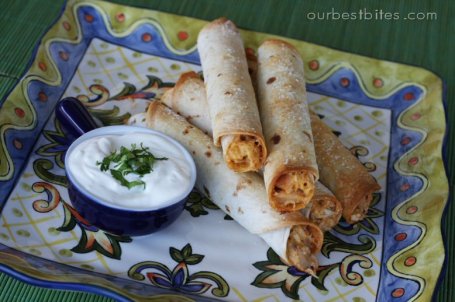
Taquitos
We recently acquired a Sam’s Club membership (thanks Kim!), which has been a delight for the cheap Icees, bulk designer clothes and bargain vacuums. What’s not so delightful?
Every time we go to Sam’s Club, my husband begs me to buy the huge, bulk sized nasty frozen taquitos. Bleck. I love Mexican food, but frozen food? Not so much. Frozen Mexican food? Even less.
Then I stumbled upon this recipe on Pinterest: http://www.ourbestbites.com/2009/04/baked-creamy-chicken-taquitos/
I made a few adjustments based on what I had available, and it turned out delish! This would be a perfect party food, as this made enough filling to cook 30+. Rumor has it they are also easily frozen.
I cooked 1 whole ~3 pound chicken in a slow cooker with some salt and pepper. I took the chicken straight out of the freezer and threw it in for 6 hours on high, with a lot of water, and it was perfectly done.
Ingredients:
Meat from 1 whole cooked shredded chicken
1 package fat free cream cheese (or full fat if you’re living on the edge :))
1 can black beans, drained
juice from 1 whole lime
Mama’s Spice or any favorite Mexican spice mix, to taste
1 small jar green salsa
1 handfull of Cilantro, roughly chopped
2 cups shredded colby jack cheese
2 packages fajita tortillas
Shred chicken, maximizing as much as possible. (dark meat is your friend! Not your heart’s friend, but your friend!)
Warm cream cheese in microwave for 30 seconds, or until stirable. Mix in juice from 1 lime, and can of green salsa. Fold in chicken. Throw in cilantro and fold in black beans. Lastly, mix cheese into the mixture and season to taste with spices. Don’t add salt – the mixture is already a bit salty from the chicken/beans/salsa, and you will be topping the taquitos with salt.
Lay aluminum foil out on cookie sheets. (You may need several, or to cook several batches)
Put 4-5 tortillas at a time in the microwave between two paper towels. Microwave for 30 seconds. This will make the tortillas pliable. Put heaping spoonful of mixture in tortilla, roll tightly. Place seam-side down on pan. Repeat until pan is full. Do not let your taquitos touch.
Spray taquitos lightly with cooking spray, top with sea salt. Bake at 450 degrees for about 12-15 minutes, or until lightly toasted and dark brown on ends. Taquitos should come out nice and crispy.
Serve with salsa, sour cream of quacamole.
Warning: Taquitos do not taste as crunchy the next day. However, they would be delicious turned into enchiladas the next day by covering the tops with sauce and cheese and baking until heated through.
Low carb (but tasty, I swear) lasagna
So part of this ‘eating better, budgeting more, cleaning more, being an adult’ crap has included eating less carbs recently. Glorious, glorious carbs.
One thing that had been missing from our diet was Italian food, since there are so many carbs involved in delicious pasta. One night, when watching Throwdown with Bobby Flay, he was making (or the competitor was making? I don’t know. My mind doesn’t work) lasagna with zucchini as noodles.
Now lets pause a minute. You’re probably wondering, how can zucchini taste as good as noodles? But I swear, you really won’t miss it. And it’s fairly easy.
What you need: 3 large zucchinis, or 5 medium-sized zucchinis
2 jars chunky garden pasta sauce (or homemade pasta sauce if you’re a better person than me)
1 large container part-skim ricotta cheese
1 egg
1 package 2% mozzarella cheese
1 package sliced mushrooms
1 onion, diced
Basil, oregano, rosemary, cracked pepper, garlic powder and onion powder to taste
1 pound ground turkey
2 tbsp EVOO
Peel zucchini, and slice zucchini length-wise into long, skinny (about pasta thickness) strips. (Reserve any remaining ends/green parts/bad cuts) Salt the zucchini strips and toss in strainer, let sit for 1 hour. Then rinse and pat dry.
Warm pan with EVOO, and fry ground turkey until cooked through. Place into bowl. In same pan (reserving some of the grease), stir diced onions and sliced mushrooms into pan and cook for 2-3 minutes, remove in same bowl as meat. Pour in 2 jars of spaghetti sauce, stir. Dice any remaining zucchini that is not in strips and mix with sauce. Season with garlic powder, onion powder, basil, oregano and rosemary to taste.
Mix container of ricotta with egg, garlic powder, and a pinch of cinnamon and nutmeg (sounds weird, but trust me, delicious). Mix 1/4 of package of shredded mozzarella in with cheese mixture.
Grease a 9X13 pan. Layer 1/3 of sauce/meat mixture across the bottom. Top with zucchini ‘noodles’. Spread with 1/2 ricotta mixture. Top with 1/3 sauce. Top with zucchini ‘noodles’, spread with 1/2 ricotta mixture, top with remaining sauce, then sprinkle remaining package of mozzarella on top.
Wrap with aluminum foil and bake for 40 minutes at 350 degrees, then uncover and bake for 20 minutes at 350 degrees. Let stand for 10-15 minutes then cut and serve.
Healthy fajitas
I love, love, love Mexican food. Mexican food and eating healthy, don’t usually go hand in hand. But we recently made some super tasty fajitas that came with no guilt by using some simple substitutions.
Instead of sour cream, Greek yogurt.
Instead of flour tortillas, corn tortillas.
Instead of chicken or beef, shrimp.
No rice or beans. (this was a sad loss)
2% milk shredded cheese instead of normal shredded cheese
Slices of avocado instead of guacamole
Fajita filling made out of: Shrimp, onions, red and yellow peppers, and tons of sliced mushrooms, sauteed in olive oil/sesame oil, covered in lots of black pepper, a bit of salt, some garlic powder, and heavily doused in Mama’s Spice (A great spice mix from New Mexico).
Topped with chopped tomatoes, slices of avocado, and a bit of salsa.
Depending on how much you pile on top of the fajitas, each fajita is roughly 200-250 calories.
Making a wish list
My husband and I have been working on creating wish lists for each other for future gift buying situations, and also just for fun. (There’s not much budget for actual shopping, so it’s fun to dream)
My wish list has some of the usual suspects for a girl … purses, jewelry, perfume. But also some unusual items:

Le Creuset stock pot in Caribbean blue. I would just leave it on my counter. I can't stop looking at it.
The ultimate in gourmet: Hamburger pizza
Hamburger pizza is one of those things that both shouldn’t be good and should be amazing, all at the same time. And also, having recently posted a recipe for bosco sticks – I realize I need to up the ante on the grownup-ness of my cooking. Ha.
This pizza is loosely based off pizzas from two of my favorite restaurants in our area: The Tap Room in St. Joseph has an amazing barbecue brisket pizza with barbecue sauce and pickles, and the Hangar dine-in movie theatre in Maryville’s hamburger pizza.
The latter sounds almost disgusting, doesn’t it? Hamburgers are good, pizza is good – but together? It should be disgusting, but it’s delicious – and a great, kid-friendly food.
So when we read the description in the menu, we weren’t sure. Special sauce, cheddar cheese, crumbled burgers, pickles, onions. Uh, did that just say special sauce? However everything we had from the Hangar was delicious, so we decided it was worth a try. Oh boy, it was amazing. So we set about to recreate it one day when we had leftover burgers, and it tasted damn close at a fraction of the cost of going out to eat.
Here’s what you need. The dough (again with the bread machine):
Layer in bread pan (or use any pizza dough recipe you prefer, or buy premade crusts):
1 cup beer
1 tbsp shortening
1 tbsp sugar
1 tsp salt
1 tsp garlic powder
1 tsp pasta sprinkle (or use 1/2 tsp dried basil and 1/2 tsp oregano)
3 cups white flour
1.25 tsp yeast
Run on dough setting until cycle is through. Remove dough from bread machine and add a bit of flour as needed. Knead dough on bottom of a well greased roasting pan, dough should stretch most of the way (it rises as it bakes, so thin is OK). Brush with 1 tablespoon melted butter.
Meanwhile:
For sauce on pizza, mix:
1 tablespoon spicy mustard
1.5 tablespoon mayonnaise or Miracle Whip
3 tablespoons ketchup.
Spread on bottom of pizza. (If this doesn’t appeal to you, you could also use barbecue sauce, ranch dressing – anything that you would like on top of a burger)
Toppings:
1/2 pound cooked ground beef, turkey or bison, or 1/2 pound crumbled burgers.
1/2 cup diced onions
About 1/4 block of muenster cheese, cut into thin slices
1 cup shredded cheddar jack cheese (or just cheddar)
1/3 cup diced pickles (I used my homemade pickles, which are similar to a thick-cut bread and butter pickle. If using thinner store-bought pickles, layer under cheese instead of on top)
Crumble 1/2 pound of precooked burger meat leftover from burgers (we actually used bison burgers), or cook 1/2 pound of burger and crumble. Layer on top of sauce.
Next, layer 1/2 cup of diced onions on top of meat.
Then, layer muenster cheese on top of onions.
Then, layer shredded cheese.
Then, top with pickles.
Bake at 400 degrees until crust is golden brown and cheese has turned slightly golden, or about 30 minutes (start checking after 20 minutes to ensure desired doneness).
Serves 4-8, especially if served with side dishes. Enjoy!
Green onion potato bread – easier
A few posts ago I gave you a recipe to make with leftover mashed potatoes. This recipe is almost as good – and just uses potato flakes.
For the bread machine version, layer the following into the bread machine pan:
2/3 cup mashed potato flakes (I used the extra butter kind, any kind work)
1.5 cups water, or 1 cup water, 1/2 cup milk
2 tablespoons oil (I used Tuscan herb olive oil)
2 tablespoons sugar
1 tsp salt
1 tsp garlic
1/3 cup diced fresh green onions
4.25 cups flour
1.25 tsp yeast
Bake on normal bread setting. When finished, place on cutting board and rub all over with butter. This makes a small, dense, delicious and filling loaf.


